 |
|
|
| |
 |
Customized to Fit Perfectly
The enclosure sizes are customized
to be able to accommodate our
various terminals, with windows
and openings for your fingerprint
scanning, USB flashdisk, and WiFi
antenna |
|
 |
No More Vandalism
Is your FingerTec terminal exposed
to damage? The robust and
resistant material of the FingerTec
enclosures help protect against
vandals and other physically
damaging forces that you may not
foresee. |
|
| |
|
 |
Providing Transparency
The enclosure is easy on the eyes
with the material allowing 92% of
visible light through at a thickness
of 3mm. |
|
 |
Robust Material
The enclosures are made of a
robust material that does not fade,
discolor or crack easily, and most
scratches can be easily buffed
away. It is no wonder this material
is used on airplane windows! |
|
| |
|
 |
Card-friendly
Have you opted for card
verification? The enclosures still
allow you to use your card
scanning technology with the
“touch and go” concept. No
interference involved. |
|
 |
Strong But Light
These protective enclosures are
not just hard, but also light. This
makes it suitable for mounting in
most surfaces. |
|
| |
|
 |
Protect Your Terminal
FingerTec enclosures help protect
your terminal from dust and
vandalism. So don’t hesitate to
install your terminals outdoors
anymore! |
|
 |
Simple Installation
Installing these terminals are a
piece of cake. With a mounting
plate included, the enclosures
come with an DIY installation
guide to make things easy. |
|
|
| |
| Layout Plan |
| Installation Diagram |
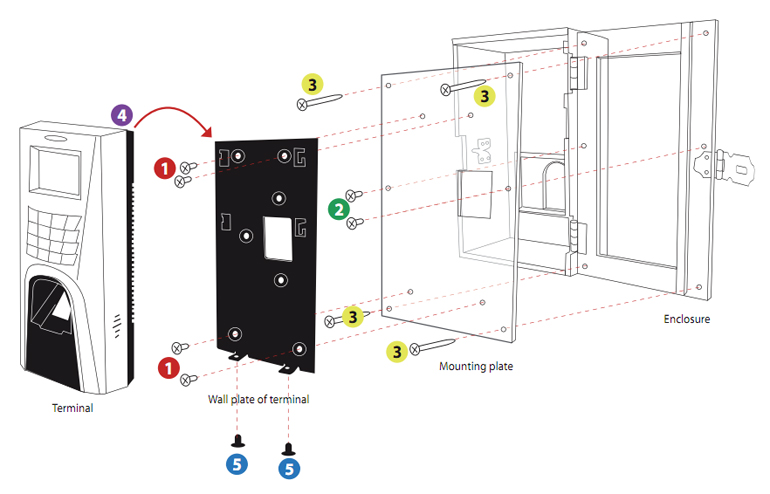 |
| 1. |
Position the wall plate properly on top of the back plate; tighten the bolts and nuts to join these two plates together securely. |
| 2. |
Position the back plate that has been attached to the wall plate, and the terminal to the enclosure; tighten the screws to secure them on the
enclosure. |
| 3. |
Mount the enclosure on a wall or a surface and tighten the screws to secure its position. |
| 4. |
Hang the terminal on the wall plate, tighten the 2 screws at the bottom of the terminal. |
| 5. |
Make sure that the enclosure has been mounted firmly by tightening all the screws. |
|
|
Note: Installation of enclosure with access control models
Before you start with step no. 1 above, make sure that all the terminal's wires are put through the enclosure, back plate and wall plate, and all the wires are
connected to the terminal's port correctly. |
|
| |
| Specifications |
| DIMENSIONS (L X W X H), mm & WEIGHT, kg |
| Kadex : 118 x 86 x 165 (0.5) |
| AC900 : 127 x 70 x 205 (0.5) |
| M2/R2 : 127 x 70 x 205 (0.52) |
| AC100 : 222 x 78 x 165 (0.66) |
| TA100 : 224 x 77 x 165 (0.66) |
| TimeLine 100 : 224 x 77 x 165 (0.68) |
| Q2i/TA200 Plus : 224 x 75 x 185 (0.72) |
| i-Kiosk 100 : 290 x 86 x 345 (0.82) |
| i-Kiosk 100 Plus : 290 x 86 x 345 (1.68) |
| Face ID 2 : 192 x 130 x 230 (0.95) |
| Face ID 3 : 116 x 83 x 234 (0.6) |
| Face ID 4/4d : 172 x 137 x 172 (0.65) |
|
| MATERIAL |
Poly(methyl methacrylate) (PMMA) |
| THICKNESS |
5mm |
| DENSITY |
1.18g/cm3 |
| MELTING POINT |
160°C |
| BOILING POINT |
200°C |
|
| |
 |
| 05/2013 |
|
Packaging
Dimension (mm): 298(L) x 123(W) x 222(H)
*Apply to all enclosures except i-Kiosk 100 Plus, Face ID 2 and
Face ID 4/4d |
| |
  |
|
|
|
|